Cette page a au moins 16 ans !
This page is at least 16 years old !
Replacing a damaged or faulty screen on C series Zauruses (I'll be swaping
screens bewteen a SL-C1000 (broken), and a SL-C860 (new))
 |
For the short story, I had my C1000 in my pocket all the
time these last two years. I traveled with it, made it fell a few times,
but it never failed. One day, after a long day at an amusement park... |
 |
I discovered that the metal case had a "bump",
and the screen was completely broken from behind: the touch screen was intact.
In fact, the screen is more likely to brake if it's hit from behind, than
from the sides. |
|


|
The next day, I was searching for some bare replacement screens, without
too much hope as the device isn't made anymore. I had no luck with bidding
sites, but a site called conics.net
were selling complete LCD modules for approx. 110 USD, and the ribbon
cable for a few more bucks. They can also do the repair for you if you
send them your Zaurus. It's cheap and you don't have to worry about braking
anything else.
Willing to learn, I immedialty ordered the screen and one week later,
I received a complete C860: quite surprising ! But after asking them by
e-mail, they just explained to me that they actually get their screens
from bricked or already damaged Zauruses, and they didn't have time to
get the screen out. Note that you'll maybe won't have this chance.
|
 |
The first thing to have is good 1.2mm flathead screwdriver,
a simple Bost Micro does the job. A philips head will certainly damage the
screws if it rips. The second thing to have is some light, and optionally,
some patience.
Remember to never apply too much force, if anything doesn't come appart
easily, there's a reason. It's too easy to cut circuit board traces or
rip appart flex cables by accident...
|
 |
I'll start with the C860, with the brand new screen. Remove
its battery, unplug it from anything and unscrew the two screws on the right
and left side of the screen. |
 |
Try to keep the screws from the different devices in separate
containers. This helps for counting and prevents from losing them. |
 |
The 4 other screws are located under the screen, here the
rotating screen comes in handy. |
 |
The same thing the other side. The 2 white plastic tabs may
fall when you'll open the case, be carefull not to lose them also. |
 |
The case is fixed in its upper part by two plastic dents.
First remove the lower part and slide it up. |
 |
As you can see, the back of the screen is only protected
by some thin and compact black foam. This isn't enough to protect it from
heavy shocks. Don't try to add some protection, the case won't close. |
 |
The C860 has an orange conductive sticker next to the screw
in the lower-left part. This screw maintains the LCD and the video circuit
board. The other pcb is fixed with two screws. It's used to get feedback
from the touch screen and to power the back light. |
 |
If you never opened this sort of device, know that the flex
cables (flat orange ribbons) break easily. Be very carefull when manipulating
them, if they get folded, it's certainly too late. |
 |
This first screw helps getting access to the video flex connector. |
 |
The sticker can be lifted. |
 |
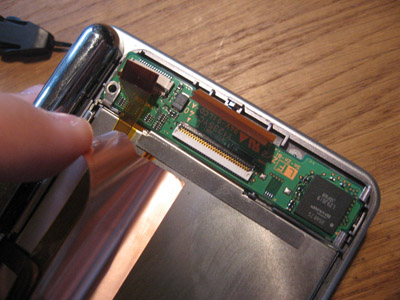
To unplug the flex cable, slowly lift the dark plastic bar
with the screwdriver. If the connector is long, like this one, lift it up
little by little. Apply some force upwards rather than towards the connector. |
 |
Once the bar is lifted up, the flex cable can be unpluged
by pushing it outwards with the plastic corners. Never use pliers ! Do the
same with the other connector. |
 |
Get the LCD pcb out the plastic case by lifting it up like
the arrows indicate. It then slides out easily. |
 |
The other circuit is fixed by two screws, I recommend unscrewing
them after the flex cables are fully unplugged. |
 |
The connectors are mostly the same, just smaller. The black
plastic bar lifts up simply by getting the screwdriver beneath. There are
3 cables to unplug: two orange ones and a white one (picture). |
 |
Once unscrewed, this pcb can be sled towards the left. |
 |
From here, the LCD module gets out easily by gently pushing
it from the outside (from where you actually see it). It's not glued anywhere
so don't use the screwdriver to lift it up, it could scratch it or brake
the glass again. |
 |
Now, let's take apart the C1000 (broken screen), it's mostly
the same procedure as for the C860. Don't forget to remove the battery. |
 |
If you hear something fall during the operation, it can
be one of the nuts that hold the two outer screws. They go in that place. |
 |
The pcbs are mostly the same, the orange sticker may not
be here anymore but it's not really important. Get the flex cables out again,
the full pcb also. |
 |
It may be a little more difficult this time because of the
two plastic things next to the Sharp chip. Just lift it up with the tip
of the screwdriver again. Bear in mind that there's another chip on the
other side. |
 |
The same thing goes for the thin pcb, 3 connectors and 2
screws again. |
 |
Get the broken LCD out. |
 |
Put in the new one, aligning the screw hole on the sticker
with the one on the case's metal tab. |
 |
Swaping done ! Know that the thin pcb can also be replaced with the C860's
one. I've done it after braking a connector. I'm not sure about the bigger
pcb though, as the chip's references differ.
Note that the LCD (wide orange) and touch screen (transparent) cables
go underneath the pcbs.
|
|

|
Now the harder has to be done: pluging back in all the flex cables. It's
harder because there's no more plastic corners to push them in. Some of
them have small holes to help machines during assembly but here, it's
not the case.
Keep all the connectors opened and align the cable in front of them, push
it in with your fingers so it's just under the dark bar. If it's just
in front of the connector or not pushed enough, there won't be any contact.
Once the cable is correctly inserted, lower the bar until you hear a clicking
sound.
You can push in the cables carefully with the screwdriver, by puting
it against the harder plastic strip, but it's risky.
|
 |
Get everything back togheter, put in the battery, plug the AC adaptator
if necessary and try it out. With some luck, your Zaurus will be operational
again :)
|
 |
If the display looks weird, like some ghosting or missing
pixel lines... Don't panic, before taking it apart again, it's maybe just
a software issue. Get the battery out again, press simultaneously the D
and M keys and put the battery in again. Depending on your model, you'll
maybe have to lock in the battery to get to the service menu. On the C1000,
it shows up automatically. |
 |
On the fisrt page, go to the second choice "2. LCD
Phase Setting". The touch screen normally works. |
 |
If your screens looks like this, try taping on the "+5",
"-5", "+1", "-1" boxes to get the better setting.
The initial values I had were 0 and 0, the screen already worked fine. |
 |
Once the best setting found, you can exit the service menu by powering
everything down.
|
 |
If by trying the phase adjustements, the display still doesn't
look good, check all the flex cables again. If you have multiple issues,
proceed by steps.
If you don't have any image at all, check 1 and 2.
If you have a splited image, check 2.
If you have erroneous (or no) response from the touch screen, check 4
and 5.
If the back light doesn't work at all, check 3 and 4.
1 is used to get the coded video data from the main board.
2 is used to send the decoded video data to the lcd.
3 is used to send the touch screen data to the main board, and to get
the back light setting.
4 is the back light's power.
5 is only the touch screen.
|


